
Wednesday, September 26, 2012
Hate to say goodbye
Ugh from the title you can probably tell, those of you going along with me knows we closed on our forever home several weeks ago. I have enjoyed crafting and sharing, I by no means plan on being absent forever. I made the decision to take a step back we have so much to get done before our move in deadline the beginning of November. So this will be my last post for awhile or at least till I get our family settled in our new home. I originally had planned to have one final tutorial before I said bye bye but with everything so hectic I haven't been able to work on anything. I'm hoping to finish up my own personal crafty projects then I will be *sniff, sniff* packing up my supplies. Truly it's the best decision where I'm at now. I really appreciate anyone who has been following along, so until next time. Toodles Stephanie
Friday, September 21, 2012
Ahead of the game
Hello party people well it is late Friday and I am so behind on getting a post out. So have any pinners came across this awesome snowman pic yet?
 | |||||||||||||||||||
| Spindle Snowman |
Luckily during house renovations there are lots of scrap pieces of wood to play with.


Wednesday, September 19, 2012
The face behind the name
Happy hump day to all, between craziness with the new house and just keeping caught up on normal house work I have been slacking on my crafting. From time to time I do allow my crafty love to fall at the wayside while I catch up on other things in my life.
I hope you all enjoyed the sign on Monday, I really enjoyed making it. Originally I thought I may have another cabinet tutorial sometime but I am not happy with how it turned out, if I get a chance to revamp it sometime then I will share.
I thought I would share a little more about myself this time around. For those of you who are just tuning in, my name is Stephanie I'm from a small town in central Missouri and I have lived here most of my life military brat with all the jazz. I graduated in 2003 and attended cosmetology school 04-05, I worked till 2007 when my husband and I made the executive decision for me to become a stay at home mom. Since then I have become an avid reader and crafter. My love of sewing started in high school but due to life and limited funds I didn't keep up with it those years.
Until last year I had always done something periodically a Halloween costume here, paint something there. I had mentioned to my mother in law I wanted to try making some hair clippies that I needed to sew and the next day she brought over a sewing machine she got at an auction for a couple bucks. It was a 1984 singer and I was ecstatic about it, I had started using pinterest at that time so I had lots of things I wanted to try making. I started with a tag lovie and those hair clips my daughter adored.
For a very short time I tried to sell my little ette's( I wanted to call them clip-ettes but it was taken). I ended up spending more money than I was making plus to face it there are a lot of hair clip artist out there. To top it off I'm not a very good sales rep but I didn't let that failure stop me from expanding my crafty prowess.
That leads me to where I am now, with Just Craftin'. I love to make things and I've had others comment how they could never do that or don't have the time. I wanted to find a way to share with everyone. That's just it, all I have been doing is just crafting, I find an idea and make it happen though 50% of the time I do ask my hubby for help with the technical parts of the project.
This leads me to my motto Imagine {Create} Share, either by imagination or finding instructions from another crafter I still always put my own spien on anything that I make. Who ever just follows the directions without putting little bit of themselves into it? {Create} just as it implies you take the steps to make the object come alive, I mean using your own hands to make something is an awesome feeling no matter what it is.
Lastly share, who doesn't want to show off what they can do to others? No matter the range on something its always great to get impute from friends/family and what better way than to let them see it. Learning from others and our own mistakes makes each of us better for it. Sometimes I completely fail but I'd be the first to admit it and see where I went wrong even another set of eyes can remedy the problem.
Whoo what a tale it is but alas it is mine and I do hope someone is able to relate in someway or another. I am happy and open to any questions so feel free to fire away.
Monday, September 17, 2012
I see a sign
Happy Monday glorious crafters. We had a very busy weekend, it was quite messy. Home renovations make seem to get messier than cleaner has you go along but progress is being made and I couldn't be happier.

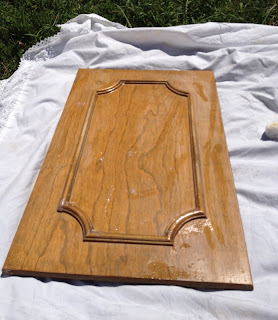
So I mentioned we tore out all the old cabinets in the new house, well hubs wanted to save some for his man space in the garage. I did manage to snaggle a few cabinet doors from ones that didn't make it out whole. I set out to make something, a lovely sign.
I've tried lots of shabby painting ideas but I came across one I had yet to try using a spray painting technique found HERE. I roughed up my work surface and applied the Vaseline as per the tutorial, note to self: Don't apply it in the hot sun, cause the stuff melts....oops.
My first application didn't turn out so hot pun intended because of the melting goo, I had to apply a second coat after I wiped off the Vaseline with a towel it still left enough residue for me to sand those areas down.
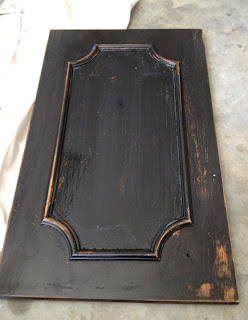 Above pictures is after one failed attempt and my second coat once sanded, I really like the rubbed through look. Which can be achieved using beeswax as well, we just happened to have friends who had bees and supplied us some. If you have questions about the technique ask away.
 On with the show, as you see I applied a crackle glaze I had. We purchased a container of the crackle two years ago and kept tight it will last me through many projects. I applied one good coat of the crackle, let dry completely then carefully applied my paint choice. You have to be careful when applying the one paint coat, it has to be a thick continuous coat with out having to go back over it- if you do it will disturb the affect and you'd have to start over.
 Letting everything cure, I then mixed some red acrylic with black for a deep color and wrote my chosen phrase over the crackle, complete with a sealant of choice. Since this was a cabinet there was a hole from the knob that I wanted to utilize, I took another matching knob and put it in place so this will be a multifunctional piece.

I'm so ready to decorate with all my pieces and once I do I'll make a page so you could tour my house. If your doing demo and come across random pieces, save them you never know what they could be. I hope this tutorial has started your Monday off on the right foot. Have a sensational day!

So I mentioned we tore out all the old cabinets in the new house, well hubs wanted to save some for his man space in the garage. I did manage to snaggle a few cabinet doors from ones that didn't make it out whole. I set out to make something, a lovely sign.
I've tried lots of shabby painting ideas but I came across one I had yet to try using a spray painting technique found HERE. I roughed up my work surface and applied the Vaseline as per the tutorial, note to self: Don't apply it in the hot sun, cause the stuff melts....oops.
My first application didn't turn out so hot pun intended because of the melting goo, I had to apply a second coat after I wiped off the Vaseline with a towel it still left enough residue for me to sand those areas down.


I'm so ready to decorate with all my pieces and once I do I'll make a page so you could tour my house. If your doing demo and come across random pieces, save them you never know what they could be. I hope this tutorial has started your Monday off on the right foot. Have a sensational day!
Friday, September 14, 2012
A prelude to the weekend
I sincerely hope that everyone a great week, It is finally cooling down here and I am ready for sweat shirt weather. Our weekend includes getting our new kitchen measured for cabinets, cleaning up concrete dust (any suggestions?), taking off more wallpaper and prepping the kitchen floor. I'm sure there is more in there for us to do but I haven't thought about it yet. Below is a picture of the kitchen, we tore out a wall to open the area into the living room. Once we get further along I'll post some more progress pictures, we plan on doing our own wood floors. I really love the hand scraped floors but at $7+ a square foot not so much so we will take on the task ourselves, I'm pretty excited to get started.

I have a cabinet DIY for you next week and I have been working on some fall/winter crafts as well. Well I am going to head out. Keep it crafty peoples and I will see you next week. Leaving you with something I find oh so true.


I have a cabinet DIY for you next week and I have been working on some fall/winter crafts as well. Well I am going to head out. Keep it crafty peoples and I will see you next week. Leaving you with something I find oh so true.

Wednesday, September 12, 2012
Red, White and Blue
Hello it's Wednesday. Are you as ready for the weekend already like I am? Well yesterday marked the 11th anniversary of 9/11, the time has flown and many are still reflecting on the tragic time the USA went through. Thank you to all the proud men and woman who were apart of the efforts to build up our country during that time and for all the Military that are still serving for it as well.
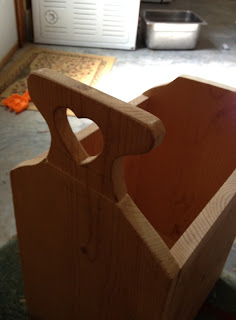
In remembrance of the USA I wanted to make something red, white and blue. If it isn't obvious by now I heart all things primitive especially Americana decor. My awesome mother in law worked an auction over the weekend, she goes through the throw away pile and she scored me this awesome piece.
I forgot to take a picture before I cut of the hearts. I do love hearts but I didn't think it went with the feel I was going for. I'm not really sure what the official name of this beauty is but I plan on using it as a magazine holder. I took a trusty jig saw and hacked off the unwanted hearts.

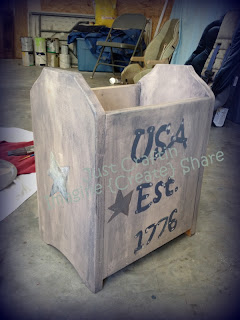
I love visiting the discount paint section in any hardware store, you can get mixed up paints for 3/4 the original price. I had a tan color that covered once really well, with the hotter weather it doesn't take long for paint to dry and I was able to get this done in just a few hours.
 I used a freezer paper stencil it ironed right onto the wood, so cool! It did rise up a small bit from the wood I don't know if its because the humidity or the paint. It still got the job done and I would use the technique again. I used some helpful info found on wikipedia on the USA and a Americana flag for the other side.

I painted the blue square and let it dry before I put the flag down so the stars would be visible.


Here it is almost finished I decided that it just need a little bit more. Using a glazing technique with 1/2 clear glaze and 1/2 acrylic paint, I wiped it on to give it a used appearance. Let dry and complete with a clear poly finish, my favorite is mineral wax water based no smell and easy clean up.

 Turned out wonderful if I do say so myself. Did you see? (picture below) My wonderful husband got me two vintage wagon wheels, I have wanted one for the longest time as home decor and he surprised me with them for the new house. He even placed them in a perfect spot for me, I just wanted to share. Any who I guess I better get, my joyful children have woken from naps in a great mood. Have an inspiring day!

In remembrance of the USA I wanted to make something red, white and blue. If it isn't obvious by now I heart all things primitive especially Americana decor. My awesome mother in law worked an auction over the weekend, she goes through the throw away pile and she scored me this awesome piece.
I forgot to take a picture before I cut of the hearts. I do love hearts but I didn't think it went with the feel I was going for. I'm not really sure what the official name of this beauty is but I plan on using it as a magazine holder. I took a trusty jig saw and hacked off the unwanted hearts.


I love visiting the discount paint section in any hardware store, you can get mixed up paints for 3/4 the original price. I had a tan color that covered once really well, with the hotter weather it doesn't take long for paint to dry and I was able to get this done in just a few hours.

I painted the blue square and let it dry before I put the flag down so the stars would be visible.


Here it is almost finished I decided that it just need a little bit more. Using a glazing technique with 1/2 clear glaze and 1/2 acrylic paint, I wiped it on to give it a used appearance. Let dry and complete with a clear poly finish, my favorite is mineral wax water based no smell and easy clean up.


Monday, September 10, 2012
Here fishy, fishy, fishy!
Greetings and salutations everyone, I am so glad the weekend is over between our fall festival and my sons birthday I don't think I had a spare minute to breath. Though it was all completely worth it the kids had a blast and that's what matters most
Now back to regular scheduled programming, I am posting my pictures of my sons fish cake that I made for his 2nd birthday. Living at my mother in laws the kids and hubby have been checking the fish trap in her pond and Jace just loves it. It was a no brainer to make his cake, since making one for my sisters shower I have been wanting to try it out more and more.

Here is my little man showing of his number and his cake. Along with my short cake showing I will also include how I made the shirt he is wearing.

I have enjoyed the ups and downs of working with fondant, it's definitely something you just have to jump into and start working with. Tips and tricks from lots of sources are great but when it comes to actually applying it that takes time. I had some left over teal fondant(this stuff stays fresh long if it's properly wrapped) and made some white used small circle cookie cutter to get scales. Covered the whole thing with yellow fondant and staggered the scales little at a time till I got my desired look.


 So start up your preferred writing software and figure out what you want your shirt to say and print out a template. Lay your freezer paper glossy/shiny side down this will adhere to your shirt. Using an X-acto knife and cut out your lettering/graphic, if you have an open letter like an A or E save the interior pieces you can iron them on as well. After you get them cut position how you want the stencil and iron into place on your pre-washed item. I used acrylic paint but any fabric paint will do, let it dry then just peal it off. Say what!? It was so easy and I could just imagine all the other things I can use this idea with.
 See the above picture for the finished result. Well that's it, I hope you have a chance to try these out sometime. I'm not sure what is in store this week but I can assure you it will rock. Have a great Monday!
Now back to regular scheduled programming, I am posting my pictures of my sons fish cake that I made for his 2nd birthday. Living at my mother in laws the kids and hubby have been checking the fish trap in her pond and Jace just loves it. It was a no brainer to make his cake, since making one for my sisters shower I have been wanting to try it out more and more.

Here is my little man showing of his number and his cake. Along with my short cake showing I will also include how I made the shirt he is wearing.

I have enjoyed the ups and downs of working with fondant, it's definitely something you just have to jump into and start working with. Tips and tricks from lots of sources are great but when it comes to actually applying it that takes time. I had some left over teal fondant(this stuff stays fresh long if it's properly wrapped) and made some white used small circle cookie cutter to get scales. Covered the whole thing with yellow fondant and staggered the scales little at a time till I got my desired look.


I used 3 throw away 8 inch pans to make the hole thing, marbled cake and the white with blue food coloring it looked liked waves when it was cut. Two pans made the main body and other half made the bubbles along with the tail. This cake was filled with an oreo filling found HERE. I altered the recipe reduced the whip topping to 1 cup and used powdered sugar instead with 3 extra Tbs. (It was so yummy)The cake was a hit and everyone seemed to enjoy it alot I would make the filling again.
So now that I have made everyone hungry, I'll wait a few while you go ahead and grab a snack......Got it? Alright let's continue onto the cute shirt.
I have
recently discovered the wonders of freezer paper and I haven't even made
a dent in what all can be done. One thing it does make great stencils
who'd of thunk it? I should would not have.


Friday, September 7, 2012
Electrifying
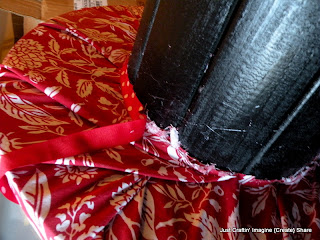
Happy Friday peoples! I've been slacking I know but I come baring a gift of electricity...well not exactly but something that goes along those lines. My husband is an electrician and knows what I have been wanting a spool to get my hands on. Well he came through with one for me I'm hoping he can get me another so we'd have a matching set. I plan to make a settee out of it and wanted to share it with everyone.
 Here is my daughter Jenesis posing, she wanted to help. Well, first off you need a spool make sure the slates are secure. It's just plain ol' wood and I didn't bother with sanding I knew th paint wouldn't have a problem with adhering to the surface. I took a matte black spray paint, one can did it perfectly though next time I will just use a regular instead of a matte because it rubs off I had to use a clear coat too. I did not coat the top as it would be covered anyways.

On a spool there are nuts and washers on one end that hold the bars that secure the whole thing, I placed that end up so the cushion would cover it and protect any flooring it may be placed on.
 My supplies were spray adhesive, convoluted foam mattress pad(full), upholstery fabric 1 1/2 yards, trimming for the edges you could omit this part if you like. I happened to find this cute pom pom trim that was .75 clearance couldn't pass it up. Originally I wanted to add covered buttons to give it structure, but I had a hard time position them so I nixed that idea (maybe next time).
 To cut the first layer foam I place the spool upside down and cut it out using a x-acto knife much easier than scissors. Then I staggered the remaining layers, if I do another one I will use all the same size. It made it lumpy and wasn't as full as I would have liked. Using spray adhesive I glued each layer together and finally to the spool itself so nothing would shift.

 Using a staple gun start at 4 points then work your way around I tucked it up under. Again if I did another I would only go to the edge of it cause any staples would be covered by trim and there wouldn't be as much fabric waste.
 Using what I had on hand I trimmed the bottom then added some ribbon to cover it up. Again using the above suggestion in the future.
 I finished it off with the pom pom trim, I give myself a B- this time. As with anything there is a learning curve and I plan take it to heart for a later date. My kids love it so, it is not a total lose on that regard I plan on placing this in our family room basement when we move in. It is very sturdy and love the upcycling craft of this. Well that is all for today lovey crafters, I hope your weekend is wonderful and you come back next week to see what I have cooked up. Leaving you with a little inspiration for today.


On a spool there are nuts and washers on one end that hold the bars that secure the whole thing, I placed that end up so the cushion would cover it and protect any flooring it may be placed on.


Tuesday, September 4, 2012
One step closer
Oh what a weekend we started it off by closing on our forever home and it's been a whirlwind since. We have lots of renovations that we plan to do to it before we even move in. I am only so good with a power drill and the rest hubs or the professionals take care of.
Here is our lovey new home, but I had to come up with things to make it our own. My husband is more the construction big picture man while I am more into details. Even thought we haven't moving in right away I wanted to put my own stamp on it that says "Hey, we live here." I was so stocked I now have double the doors to decorate for the holidays and such, I can not wait. The main priority is the inside, the outside upgrades will come later unless I do them.

I did get my hubs to show me some basic electrical so I could change out the two wall lights by the doors, I also ripped out the dead plants in the planter box and painted the doors so far. I am hoping to make some wreaths soon and I will have a tut for you then.
Since I can't do much mechanically I did some looking and found a board that just screamed "Pick me!" I decided to turn into a last name plaque for the main doorway we plan to use which is the far left.


This week is our fall festival so we will be having fun with that along with my little man's 2nd birthday Sunday. I will be posting as much as possible as the time allows, I hope your week started great. Toodles and Happy crafting!
Subscribe to:
Comments (Atom)